Soldat's Comprehensive Competitive CTF Tutorial
Contents
Introduction
This tutorial is directed towards new and intermediate Soldat players who would like to improve their gameplay and is focused on the gather mode (3v3, randomized teams, all weapons) rather than big team battles, duels, or custom sub-game modes. Experienced players may be able to learn from this tutorial as well.
Actively playing gathers will strengthen your gameplay. You will also have the chance to meet the best Soldat players around and become part of the competitive Soldat Community.
The skill level in gathers is relatively high compared to public servers — meaning there is a learning curve for newer players in most cases. Becoming familiar with all the concepts and tactics used in gathers usually takes months to years of experience. However, don't be discouraged to get involved because of this! This tutorial is designed to help new players progress faster.
Keep in mind that circumstances may constantly change in a Soldat CTF match. Being able to adapt your play style quickly goes a long way — especially in gathers. The only way to learn how to do this is through experience, which is why practice is the most important thing. This tutorial is merely meant to provide some general helpful tips to keep in mind throughout the game.
Server settings used in Gathers
- Default Format: 3v3 (best of 3 maps)
- Time Limit: 10 minutes (per map)
- Respawn Time: 3-5 seconds
- Capture Limit: 10
- Weapons: All (no stationary guns)
- Bonuses: Disabled
Map knowledge
It is highly recommended to familiarize yourself with the popular gather CTF maps (listed below) prior to playing. To do so, you can:
- Start an offline session ("START GAME" in-game tab) to walk around the maps and explore paths.
- Play on CTF public servers ("JOIN GAME" in-game tab) to gain experience playing with other people on the maps.
The most popular maps in gather nowadays are:
- Guardian
- Rotten
- IceBeam
- Wretch
- Blade
These maps are favored is due to their size and fast gameplay which suits the 3v3 format gathers use. Servers running big-team game modes will typically use larger maps to fit the large number of players.
Weapons
Soldat does not have classes or a buy system to determine which weapon you can choose from, and you also do not run out of ammunition. You can select from all available weapons without limitation. You can change your weapons whenever you re-spawn. Press [TAB] to enable or disable the weapons menu.
Weapons will provide greater damage when player’s inherited velocity is greater, meaning you will do more damage moving towards your target. You will also take more damage moving towards the enemy’s bullets.
Weapons in Soldat are fairly balanced. However, it is recommended to adjust your choice of weapon depending on the map and situation.
Playing Barrett on a fast-paced map such as ctf_Wretch might not be considered the best weapon choice of weapon, while it's a better choice on larger maps such as ctf_Nuubia or ctf_Mayapan.
Tip: You can equip yourself with 2 primary weapons (e.g AK-74 & Barrett). To carry 2 primary weapons simply drop your secondary weapon and pick up a weapon from the ground.
Gathers are currently testing the new weapons mod (WM) for the upcoming Soldat version 1.7.2.
You can view the new weapons mod here or test it in #gather on our Discord server.
Movement
• Haste's Comprehensive Movement Tutorial
The first one is an in-depth tutorial of all movements in Soldat. The second one will teach the most fast-efficient set of movements
Aim
Crosshair
The crosshair is the thing you move around with the mouse. It indicates where you’re aiming. Placing the crosshair on a teammate will show their nickname, and health points percentage. Placing the crosshair on an enemy however, will only show their nicknames red (Doesn’t work on crouched or proning enemies).
Crosshair placement
The best crosshair placement depends on the gun, your and your enemy’s movement, and the distance between you and your enemy. Some weapons bullets lose speed as they go further. In order to better understand bullet velocity, try shooting at enemies in different situations and angles.
Also, if you’re getting shot, most guns will become less accurate (bink) due to getting hit. If that wasn’t enough, most guns will become less accurate (bink) when you get hit by bullets, and you movement can affect accuracy (for instance: Barrett & Ruger-77).
Practice
A great way to practice your aiming skills outside of gathers is engaging in what’s called “1vs1 aim”. The best setting would be a server with CTF set as its game-mode on the map: Rok. This way you always re-spawn at the same spots and not randomly across the map, making it easier to focus on aiming. At each round, use your primary gun only (no secondary, no grenades) for 10 minutes. No fancy running away, just engage in aiming only - Stats don’t matter in this practice meta, just try to focus on your aim.
Capture the Flag (CTF)
This game-mode consists of two teams: Alpha (Red) & Bravo (Blue). The goal is for each team to steal the enemy's flag and bring it back to their own flag. The team with more captures (caps) in the round (each map is a round) are the winners. The team with more captures (caps) at the end of the round (each map is a round) wins.
There are 32 default CTF maps in Soldat, as well as hundreds of custom made maps.
Games in Soldat CTF are solely decided by cap difference. That means capturing the flag, or preventing your opponent from doing the same, should be the driving motivation for everything you do during a game. Sounds obvious, right? But it's easier said than done. In fact, some might say that this is one of the most common sources of mistakes, even among experienced players. With so many other things going on, it can be hard to keep track of the position of both flags at all times. The most helpful tool for this task is your interface.
Being roughly aware of where the flags are is well and good, but you will also have to react correctly. When one or both of the flags have been captured and you are still alive, your next decision will often make the difference between making and breaking a cap. Which decision is the right one will depend on the specific situation. But it is important to realize, that every time a flag gets removed from its designated spot, you have potentially reached a critical point in the game and need to be on high alert.
Some general rules of thumb include:
1) More often than not, preventing a cap is better than making a cap.
2) When your flag gets captured and you are close to a path the EFC (Enemy Flag Carrier) might use to escape, abandon any engagement you're in and obstruct that path.
3) On the contrary, when your teammate captures the enemy flag, make sure he reaches his destination safely. Do not leave the vicinity of your base to go for another attack unless you are absolutely certain that your teammate will cap without your help.
4) Even just slowing the EFC down can give your team time to move in and return the flag.
Examples:
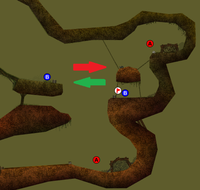
This picture (ctf_Rotten Scenario #1) shows a common situation on ctf_Rotten. You are the left Bravo player, your teammate has just captured the enemy flag. Prioritizing the flag in this situation means staying put in your position, it is also important not to jump or use jetpack. This allows your teammate to throw the flag to you as indicated by the green arrow. If you are still standing on the platform you can catch the flag and jump immediately, either setting up a powerful throw towards your base or an escape. This will more often than not result in a cap for your team. A common mistake in this situation is not to stay on the platform, but to rush towards the upper enemy spawn in order to get some kills, as indicated by the red arrow.
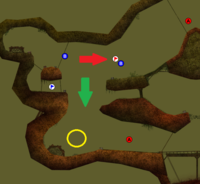
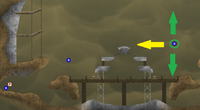
Another example on ctf_Rotten (ctf_Rotten Scenario #2). Your teammate is escaping with the enemy flag and about to score. Opponents are chasing from top and low. Low is the faster route, so it is important that you block off the rushing enemy (green arrow). Even if your teammate does get killed from the enemies chasing him top, the flag will often fall towards the lower spawn of your base (yellow circle), where you are still waiting. A common mistake is to go into the direction of the red arrow, trying to block the enemy top. In that case the enemy chasing low will more often than not get in close, kill your teammate and return the flag before you can react. This can possibly even lead to your opponent setting up a cap instead.
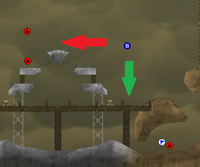
In this example (ctf_Guardian Scenario), it is your opponent who has just captured your flag. You're the only team member alive. To stand a chance in preventing a cap, you need to completely change focus from the two enemies in front of you towards the low/mid route. Throw nades low and try to occupy the middle bridge, in order to buy your team as much time as possible to reinforce.
Roles
The main goal of CTF is of course getting as many captures as possible. However, there are also roles for each player in a team. The roles may vary between different maps and different teams. It is utterly important to think what's good for the team and to play together. Teamwork makes the dream work!
These roles aren't pre-set in Soldat, and should be communicated with your team before each map. In reality, the plan does not always work, hence roles should be flexible. Prepare yourself for being creative in case the roles don't work out perfectly and find the ways to cover your teammates failures, or communicate to swap roles mid-game if the current tactic does not work out.
Usually two players take the main route, usually it is the bigger route. while 1 player takes the alt (alternative) route, usually a narrow or isolated route commonly used for escaping with the flag. Sometimes, if your team wants to put in a little more pressure, it's possible to skip the alt route from time to time (providing it is clear of enemies) to get quicker into their base and apply more pressure. But! it might leave your base undefended.
Personal gamestyle roles
Rusher
The role of a rusher is to dive straight into the enemy's base in attempt to snatch their flag, sometimes even completely ignoring enemies in order to get that capture. However, it might be considerably smarter to eliminate enemies whilst still trying to rush to the flag. Your teammates will need cover for potential enemy leaks, so keep an eye on your base with peripheral vision even if your role is to rush. Rushing can be done pretty much with any weapon, however the M79 and Spas-12 which their boosting abilities allows for faster movement across the map.
Defender
The role of a defender is to eliminate any enemies that teammates fail to killed (leak). A defensive player is needed in most maps. That being said, it is not highly recommended to play super defensive bunker-style for 10 minutes every map, because a lot of maps are about applying constant pressure. If you have the role of the defender, try to find a balance and develop a sense of when you attack and when you defend. Defenders usually play automatic weapons because the clip-sizes allow them to eliminate multiple enemies.
All Rounder
The role of an all-rounder basically means a combination of a rusher and a defender. Stability (deathmatch-wise), flexibility (different responses for different situations) are important traits.
Attacking vs Defending
One of the most basic decisions you will be constantly making throughout a game is whether to advance, retreat, or hold your position. This is a big part of what seperates a teamplayer from someone who tries to win the game alone. Needless to say, the teamplayer is usually the more successful one.
Some general rules of thumb include:
1) Try to avoid attacking alone, unless you know there is only one enemy defending the enemy's base. It is often better to hold for a second or two to give your teammates time to catch up with you, rather than rush a well defended base one by one.
2) If your team is rushing and you are the last player to leave the base, it is your responsibility to defend the base! Check every route that leads to your base carefully,before you leave to support your team.
3) Watch what your team is doing. Try to adjust your playstyle to suit the needs of your team. If you have two teammates who are defending heavily, consider taking up the role of putting pressure on the enemy base and vice versa.
4) When in doubt, defend. If you're unsure how to help your team in a specific situation or in general, making sure your flag is safe is a good way to be useful. Eventually you will notice situations where it's good to leave the base and rush, but defending is a good way to gather some experience without being a burden to your team.
Example:
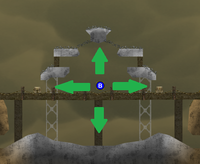
In this picture you're the Bravo player inside the green circle. Both of your teammates are attacking the enemy base. This means you're your team's last line of defense. Check both top and low carefully, as indicated by the green arrows, before you proceed to help your team (yellow arrow).
Positioning
Positioning is the art of gaining an advantage over your opponent purely by the location of your player's model (gostej). It is one of the most crucial aspects of winning duels in Soldat. Contrary to what some newer players might imagine, the majority of all duels in Soldat are decided by positioning, not by "aim". Do not misunderstand, if you're not hitting any shots you're not going to win any duels. However, the aiming mechanics in Soldat are rather simple. I dare to say any player can easily hit around 75% of their shots at medium distance, with a little practice (using one of the automatic guns). For gather players, hitting close to every shot with automatic weapons is pretty much a given, even in normal gathers (notice that this refers to a situation where you fight vs a static enemy at around the same height as you. It's not a goal to reach in the in-game weapon accuracy stats - those are almost entirely meaningless, because a good player will shoot a lot even without seeing an enemy). For this reason, positioning is very important for deciding duels and also teamfights.
Good vs bad positioning is extremely situational, it depends greatly on a number of things, starting with the map you're playing. It is thus another aspect of the game that you can best improve by practice.
Some general rules of thumb include:
1) Ask yourself what your goal in a specific situation is and adjust your position accordingly. If you're waiting for your teammate to attack together, position yourself in a way that will allow you to move quickly or even boost when he arrives. If your goal is to defend your base, position yourself in a way that makes it difficult to rush you down in order to stall your opponent.
2) On a map that's either very small and closed or allows for very fast movement, being below your opponent is often an advantage, because you will be able to get close to your opponent and throw a nade at them from below, which will (hopefully) result in instant death.
3) On a map that's very open or generally doesn't allow very fast movement, it is often better to be above your opponent, because if you can stay out of the range of enemy nades, the extra damage from your weapon will be decisive (head is easier to hit from above, gravity adds bullet speed, which adds more damage).
4) Pay attention to your team! Stay out of your team's way to reducing the chance of blocking their nades and shots. This also makes it more difficult for your opponents to take out your team, as they will have to kill you one by one, instead of just spamming nades in one direction.
Example:
This picture shows a popular position on ctf_Guardian. Due to the walls all around the position it is easy to defend with nades, especially against enemies from above. It is also very flexible, as you can reach any point of the map within seconds. If you manage to control this position well throughout the game, it will give your team an often decisive advantage.
Common mistakes
Old Dog, New Tricks
Do not be afraid to learn something new (this one is dedicated to all the oldies out there). Yes, some of us have been playing over a decade now, but it doesn’t mean that we’re always open minded. Playing 15 years doesn’t negate the fact that there might be something you've missed, or something that you haven’t developed enough. Whether it’s movement, aiming, game-sense or whichever other aspect comes to mind. Try to keep an open mind, and use losing, and observing the enemies’ actions, as a learning process. If you’ll be open minded, you might be able to enjoy the game more, and get better at it as well. Double profit.
Leaking
Leaking can mean you completely missed an enemy due to not scanning the areas whilst on the go towards enemy base. It can also mean that you've failed a 1vs1 and failed to communicate it out to your team with taunts, so they can try to cover the route.
A good way to avoid leaks is to try to keep peripheral vision and active awareness of your surroundings. If you're sure an enemy is not approaching, drag your crosshair around the corners of the map to see those blind spots and make sure you haven't missed an enemy (even if your teammates did not acknowledge you in team-chat). Also in every 1vs1 that you fail, use the respective taunt to hint your team-mates which path to cover.
Ignoring Info
Team chat, Taunts and Radio Menu are there for a reason. It's extremely important to keep communicating with the team during the match.
Soldat has key-bindings (taunts) to send team-chat messages in a fast way. This allows you to give your team the needed information such as where the “EFC” (Enemy Flag Carrier) or the “FFC” (Friendly Flag Carrier) are located. You can assign those 'taunts' to ALT + [1,2,3...A,B,C...]. Get the Soldat Taunt Editor tool to create or customize taunts.
Make sure to use the information your team provides in order to enhance team-play. Also make sure to deliver the CORRECT info to your team. If you mistakenly deliver 2 locations of enemy flag carrier, it might confuse your teammates and at times even harm the team's performance.
Sometimes people will use an "EFC LOW" taunt if friendly flag is loose low, or "FFC LOW" if enemy's flag is loose low.
It can be a little confusing, but with enough awareness, could be used to your advantage.
“Doubling” a route or not manning your route
as mentioned above, the roles are a general guideline, to keep an understanding between the teammates, who does what in the match. In most cases, not manning your route might force your teammates to clean up after your “leak” and generally might cause a lack of flow due to them having to pursue other roles. It’s a very risky move and a player should be a hundred percent sure that’s the right time or situation for doubling, meaning that the route is either completely clear or there’s a teammate covering using that path for that specific round for you.
No focus on base
In many situations it is highly important to clear the base first, for example: in IceBeam, there's a potential for multiple caps in a short time due to the skeleton of the map). Make sure to clear the base unless you're in a position that forces you to rush out of there, or you see that your teammates are defusing the situation. If you're not sure they're handling it (you see they're very Low HP), stick around until the situation is dealt with.
Points greediness
It’s a common misconception in CTF to think that you can make up for your lack of performance at flag capturing, with a good kills and death (K/D) score. However, remember that, at the end of the map, the team's capturing score is the one that matters. Be mindful of your surroundings, cover your teammates in a way that’ll contribute to the match and not only your personal stats.
Use your weapons
use your secondary weapon and your grenades! Each player is equipped with a secondary weapons (USSOCOM, Combat Knife, Chainsaw & M72 LAW). Each weapon is unique and can be used for different scenarios. You can switch to your secondary weapon by pressing [Q].
- USSOCOM pistol is usually equipped with one-shot weapons (M79, Barrett).
- Combat Knife is probably the most common secondary weapon, it can be thrown, very useful for spawn killing or instant-knife-kill upon re-spawn to prevent enemies from capturing the flag. The knife can also be used when the spawn protection is still, commonly called in the community: insta-knife (instant knifing).
- Chainsaw is perhaps the hardest secondary to use. Both for novice and experienced shooters, and especially against experienced players. You will need a good concept of movement to use it to your advantage.
- M72 LAW very good for defensive scenarios, lurking and spawn killing. You can aim to common spots and "blind shot" or use known ricochet spots to get those blind shots as well. It is sometimes used even is a preventive weapon in a way, for example: you get the flag in ctf_Dropdown and players are respawning and you push them back into spawn by hitting the poly near them. Then escape with the flag or throw flag to teammate.
- Frag grenades: Default re-spawn grants 1 grenade, and grenade kits grant a maximum of 3 grenades. Using grenades whilst shooting the enemy can provide a very quick kill with a minimal usage of bullets. It is a very effective and commonly used method. Another thing you can use grenades for is boosting on colliders to gain speed (probably should practice that as well outside of gather to prevent losing an excessive amount of health due to boosting fails).
Summary
It might seem a lot of work, but once you get used to each on of these concepts. It can pretty much become autopilot-mode, and you’ll use these good habits without thinking twice.
Productive Mindset
Playing lots without improvement can be demotivating. However, most days than others, our own attitude towards the game directly affects the game-play. It’s beneficial to eliminate any focus on bugs, eats, trolling, flaming and skill gaps. Yes, shit happens, but focusing on it won’t gain you the lead again. And might even distract you and your team.
Try to develop a productive mindset. It will undoubtedly help you develop your skill and you’ll enjoy the game even more.
If you find someone’s comments or general attitude non-profitable and only a distraction to your game-play, consider using the /mute command. Sometimes it’s better to have no info, and looking for problems actively instead of listening to a toxic teammate.
Awareness
Soldat is a very fast-paced game, and over the course of a 10 minute map, a lot can happen. It's your job to be aware of as much of this as possible. This is one of the most difficult aspects of Soldat to master. You will constantly be bombarded with information during a game, which has to be converted into decisions, sometimes within the fraction of a second. It is often what seperates a good player from a very good player.
Some general rules of thumb include:
1) Pay attention to your interface. It indicates the position of your teammates at the border of your screen, which can help in various situations. If you want to take it a step further you can also use the minimap. The kill log is also a great source of information during a game.
2) Use the free camera to scan the map when you're dead. If you press [W] after you've died, you will enter free cam mode, which allows you to scout the map for a brief amount of time.
3) Switch weapons if needed! If your opponent just stole your flag and is escaping as you respawn, pick a weapon with high bullet-speed to chase him down (Ruger-77 or Steyr AUG). If you're playing Barrett or M79 and you see opponents rushing your base as you respawn, switch to a weapon which is more suited to defend your base. You can switch back when your base is safe.
4) Try to mentally keep track of every opponent and every teammate. When did they last die? Which route are they likely to take after respawning? If you are having trouble keeping track of every single player, focus on who you believe to be the enemy team's most dangerous player.
Configuration Hints
Flag throw
Default key combination for a flag throw is [W+S], however it may interfere with some of the movements a player can perform and result in undesired flag throws that might cost the team a point. It is highly suggested to bind it to [G] because of its proximity to the W, S, A, D - default movement keys layout, and the it’s not bound to any other action. If you have customized your keys already, pick the most comfortable one for your setup.
Force Background Colors
In some maps it can very useful to have. take for example ctf_Catch, it has an extremely dark map background. Using a custom background forced color might enhance visibility. Some players use this option in all maps. This can be done inside of Soldat in the Player tab on the upper right-hand corner.
Remove Background Scenery
Removing some of the scenery objects from your screen while playing might be also beneficial for some players to relate on pure game-play and not on the excessive details some maps have to offer. While it neglects art aspects of maps, a lot of competitive players have found this setting useful. You can un-check render background scenery through config.exe file in your soldat directory, inside More tab.
Modification Hints
You can use custom modifications to enhance visibility and make it easier, for example, to see grenades or bullet trajectory better - Soldat Forums Modifications Board.
As well as Clutter Free can provide a nice cleaner look to your Soldat - Link
External Links
You can read this article on the following forums:
- Advanced Soldat CTF Tutorial by Tanaka
- Soldat Comprehensive Competitive CTF Tutorial on SCTFL Forums or on Soldat Forums by nosejj.

